This guide will go through setting up an external database for the Management Suite. In this guide Rocky Linux and PostgreSQL-14 are used, if you wish to proceed with a different distribution of Linux or version of PostgreSQL please refer to their documentation.
For all steps/commands we will need to use root, sign in as normal to the external database server and run the following command:
sudo su -
Entering your standard/root password when prompted.
There are various text editors available on Linux, we recommend nano for following this guide. This can be installed using the following command:
sudo yum install -y nano
In nano you will need to use CTRL+S to save any changes and to exit is CTRL+X.
IP of the Suite Server
DB Server recommended Specification:
Download Rocky Linux from https://rockylinux.org/download
You can download Minimal or DVD.
Follow standard installation in your preferred hypervisor.
We will want to open 5432/tcp port in our freshly installed Linux image. On Rocky it can be completed by using the following command:
firewall-cmd --permanent --zone=public --add-port=5432/tcp; firewall-cmd --reload
PostgreSQL 14 - Please refer to https://www.postgresql.org/download/ or run the following command(s):
dnf install -y https://download.postgresql.org/pub/repos/yum/reporpms/EL-9-x86_64/pgdg-redhat-repo-latest.noarch.rpm; dnf -qy module disable postgresql; dnf install -y postgresql14-server; /usr/pgsql-14/bin/postgresql-14-setup initdb; dnf install -y postgresql14-contrib; systemctl enable postgresql-14; systemctl start postgresql-14
**NOTE Ensure you install the corresponding version of postgresql contrib package when not using the one line script above. If this is skipped the Suite installation will enter a loop at 15%. The package is postgresqlXX-contrib replacing XX with your postgresql version number.
dnf install -y postgresql14-contrib
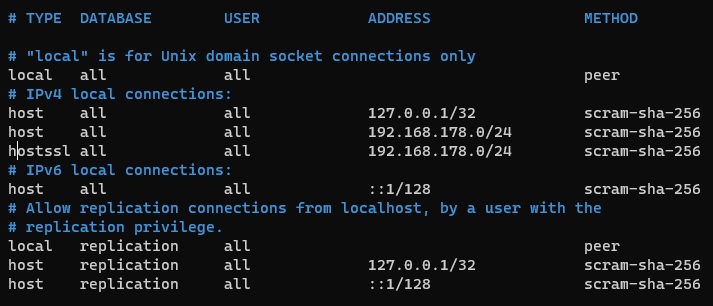
We will edit pg_hba to add Suite IP, run the following command to edit the file:
nano /var/lib/pgsql/14/data/pg_hba.conf
Go down until you see IPv4 near the bottom of the file and add the following per Suite server:
host all all 192.168.0.1/24 scram-sha-256
hostssl all all 192.168.0.1/24 scram-sha-256
Replacing 192.168.0.1/24 with your Suite IP.
For older PostgreSQL use md5 here or update postgresql.conf the following line:
#password_encryption = md5 to password_encryption = scram-sha-256

Save and exit.
We want to edit the postgresql config file, to start editing run the following command:
nano /var/lib/pgsql/14/data/postgresql.conf
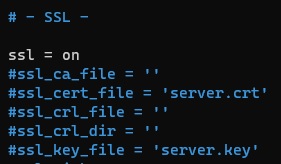
Find the following lines and change as shown:
listen_addresses = '*'
max_connections = 300
ssl = on


*Note* These specific lines can be found by using CTRL + W (Similar to the CTRL + F search function in Windows)
Save and exit
We want to create Self-Signed certificate and key using openSSL, you can use non-self-signed certificate, please refer to PostgreSQL documentation for supported SSL certificates.
To create the certificate run the following command:
openssl req -newkey rsa:4096 -nodes -keyout /var/lib/pgsql/14/data/server.key -x509 -days 365 -out /var/lib/pgsql/14/data/server.crt; chmod og-rwx /var/lib/pgsql/14/data/server.key; chown postgres /var/lib/pgsql/14/data/server.*;
We will want to restart PostgreSQL to ensure it accepts the new certificate:
systemctl restart postgresql-14
After PostgreSQL reboots we can check if it has been successful using:
systemctl status postgresql-14
We need to use postgres user for next steps which can be completed using the following command
sudo su - postgres
Using postgres user run the following command to setup the main database user required, please make sure to replace NewPasswordHere with your password:
psql -c "CREATE USER synergyskyapps with SUPERUSER PASSWORD 'NewPasswordHere';"
NOTE: The password has to be at least 8 characters long. Remember this password for Suite install
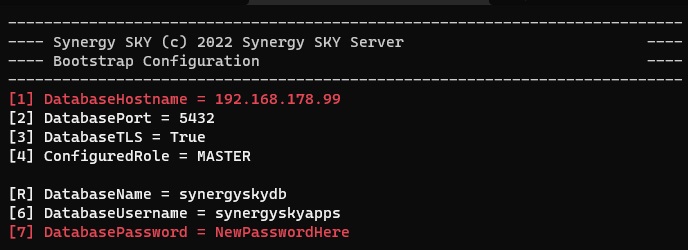
On your Suite server, point it towards the external database, this is found under 4) Advanced setup menu > 1) Change database bootstrap
In the bootstrap we want to update the [1] DatabaseHostname this will have to be set to the IP address or FQDN of your external database
We want to update [7] DatabasePassword with the password you have provided in part 1 during user creation in the database.

To verify connection is successful we can do this by typing "v". You should see FAILED with 3D000: database "synergyskydb" does not exist. This error is expected as the database has not been created yet and will be setup with the Suite installation.
If you receive other errors it can be the following:
Once we have confirmed Suite is communicating with the database and can authenticate with synergyskyapps user on the postgresql server we can go ahead and start Suite installation.
Server specs and installed packages:
Server configuration: